Upload presentasi
Presentasi sedang didownload. Silahkan tunggu

1
CppUnit – The Unit Testing A slide demo of how CppUnit’s UnitTest works by an example

2
What will you do? Step 1: Download source file CppUnit Step 2: Setting up your project in VC++ Step 3: Running our tests Step 4: Adding the TextFixture

3
Step 1 Download src CppUnit Downloadlah file CppUnit pada pertemuan ke-12 (OFC) di binusmaya!
 di binusmaya!")
4
Step 2 Setting Up your Project in VC++ Compiling and installing CppUnit libraries –Open the $CPPUNIT/src/CppUnitLibraries.dsw workspace in VC++. –In the 'Build' menu, select 'Batch Build...' –In the batch build dialog, select all projects and press the build button. –The resulting libraries can be found in the $CPPUNIT/lib/ directory –Look at the snapshot

6
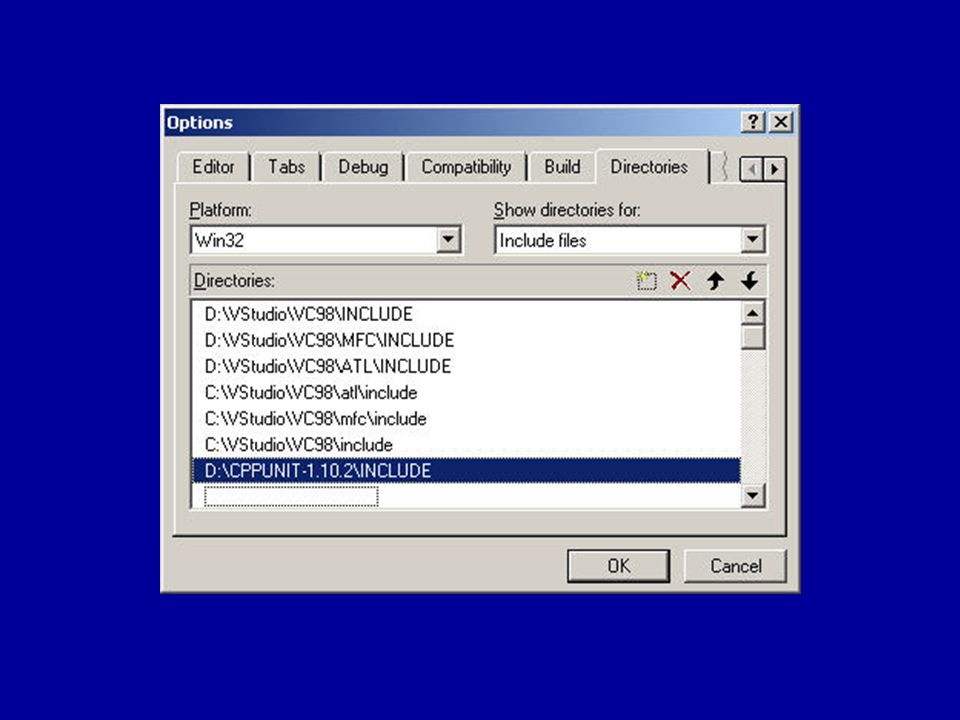
Step 2 Setting Up your Project in VC++ Setelah selesai maka hasilnya berada pada direktori $CPPUNIT/lib Kemudian memberi-tahu VC++ librari dan include yang baru dibuat itu, sebagai berikut: –Open the 'Tools/Options...' dialog, and in the 'Directories' tab, select 'include files' in the combo. Add a new entry that points to $CPPUNIT/include/. –Change to 'libraries files' in the combo and add a new entry for $CPPUNIT/lib/. Repeat the process with 'source files' and add $CPPUNIT/src/cppunit/.

8
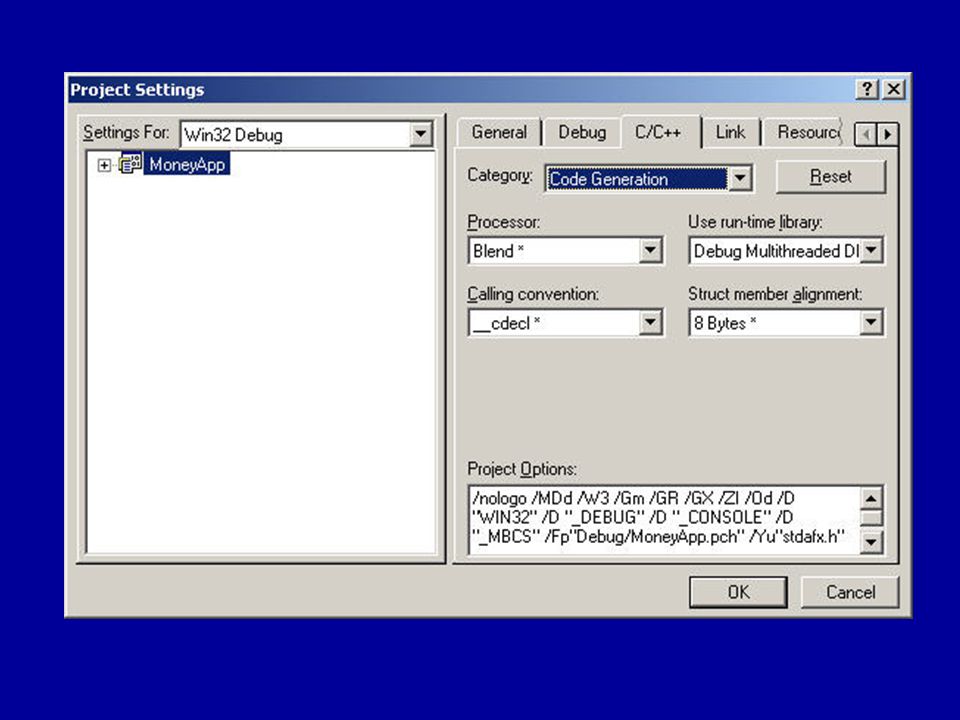
Step 2 Setting Up your Project in VC++ Getting started –Create a new Win32 Console Application, project’s name: MoneyApp –Goto menu Project – Settings (Alt+F7) –In tab 'C++', combo 'Code generation', set the combo to 'Multithreaded DLL' for the release configuration, and 'Debug Multithreaded DLL' for the debug configure, –In tab 'C++', combo 'C++ language', for All Configurations, check 'enable Run-Time Type Information (RTTI)', –In tab 'Link', in the 'Object/library modules' field, add cppunitd.lib for the debug configuration, and cppunit.lib for the release configuration. –here is a snapshot

10
Step 2 Selesai

11
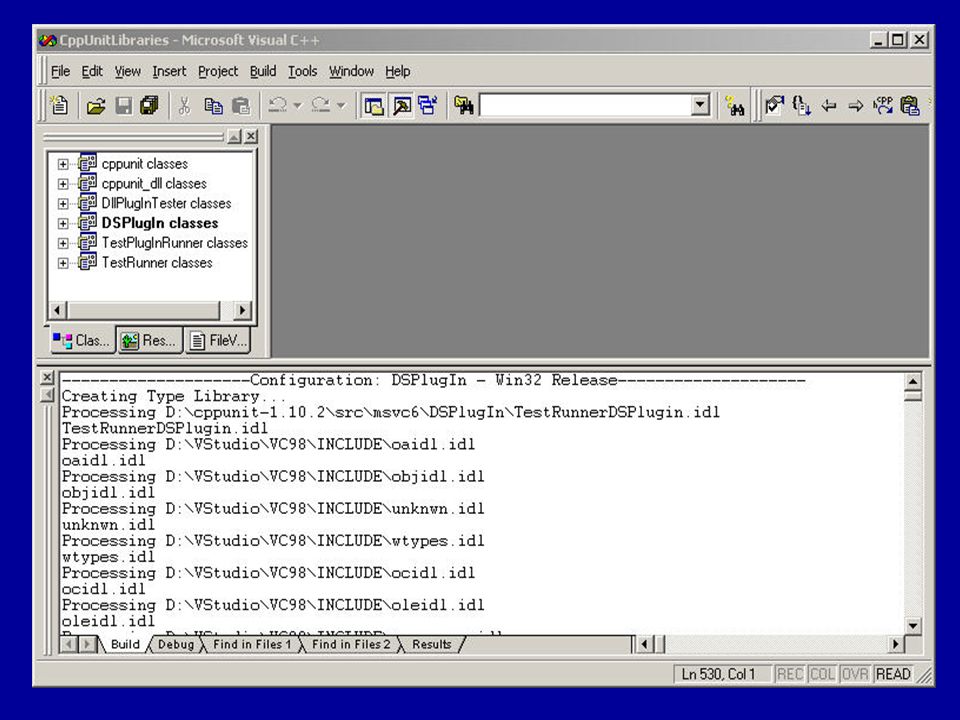
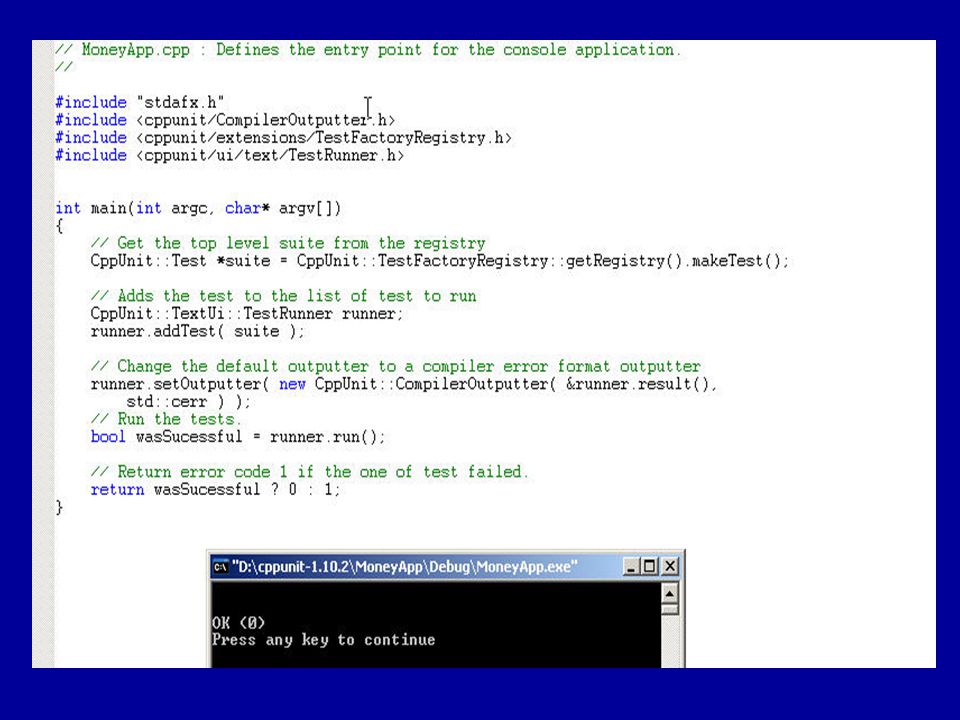
Step 3 Running our tests Pada tahap ke-3 ini, digunakan perintah –TextTestRunnerTextTestRunner –CompilerOutputterCompilerOutputter Untuk melakukan testing pertama pada aplikasi “MoneyApp.cpp” Lihat snapshot berikut ini:

13
Step 3 Running our tests Berikutnya pada tahap ke-3 ini, akan dilakukan pula “post-build step” –Untuk memberi-tahu VC++ agar menjalankan aplikasi (CppUnit test program) setiap “build” yang selesai dikerjakan. –Berikut ini adalah setting untuk “post-build step”: In the project settings, in the 'post-build step' tab: –Select 'All configurations' (upper left combo) –In the 'Post-build description', enter 'Unit testing...' –In 'post-build command(s)', add a new line: $(TargetPath)$ $(TargetPath) expands into the name of your application: Debug.exe in debug configuration and Release.exe in release configuration. –Perhatikan snapshot berikut ini:
 –In the Post-build description , enter Unit testing... –In post-build command(s) , add a new line: $(TargetPath)$ $(TargetPath) expands into the name of your application: Debug.exe in debug configuration and Release.exe in release configuration. –Perhatikan snapshot berikut ini:.")
15
Step 3 Running our tests Hasil dari “Post build step”:

16
Step 3 Selesai

17
Step 4 Adding The Fixture Apa itu “Fixture” –Fixture: sekumpulan objek yang berfungsi sebagai basis dari sekumpulan Test-Cases (Skema Testing). –Fixture mempermudah kita melakukan Testing pada saat men-develop program. Kita akan membuat class Money –Class Money terdiri dari nilai uang dan jenis mata-uang

18
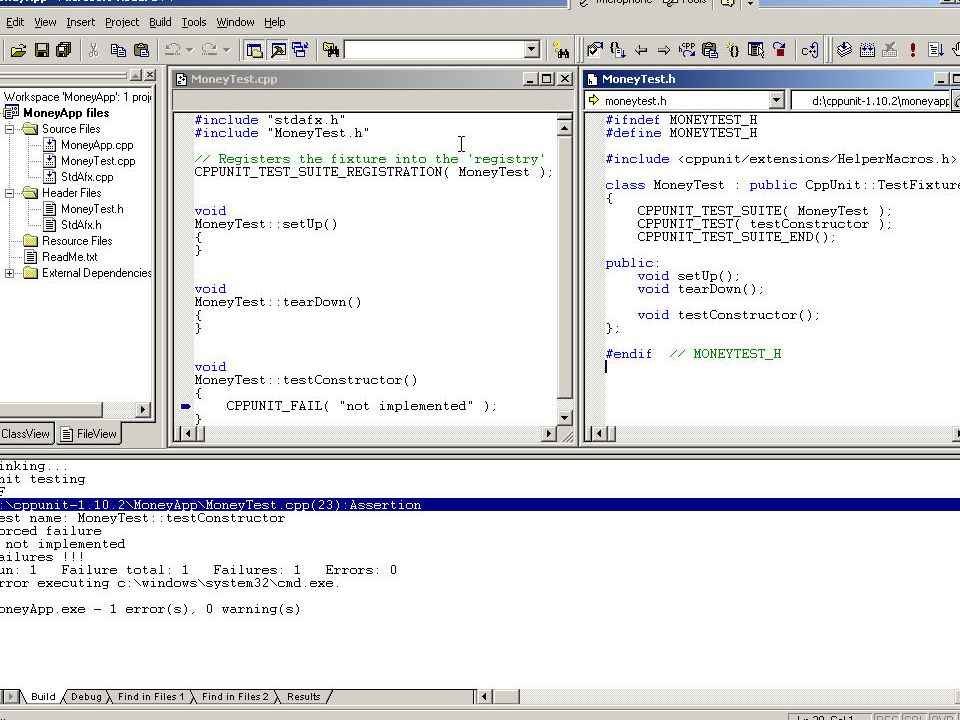
Step 4 Adding The Fixture Dimulai dari membuat fixture untuk class Money dan membuat satu test untuk Money constructor. Dua file yang akan dibuat adalah: –MoneyTest.h Berisi definisi dari class MoneyTest –MoneyTest.cpp Implementasi dari member-function MoneyTest Lihat snapshot pada slide berikutnya.

20
Step 4 Our First Test Sebuah Test biasanya terdiri dari 3 bagian; –Data yang akan digunakan untuk Test –Proses berdasarkan data yang dimasukkan –Output berdasarkan hasil dari proses –Akan diimplementasikan pada file MoneyTest.cpp Class Money dibuat pada file Money.h Perhatikan snapshot pada slide selanjutnya

22
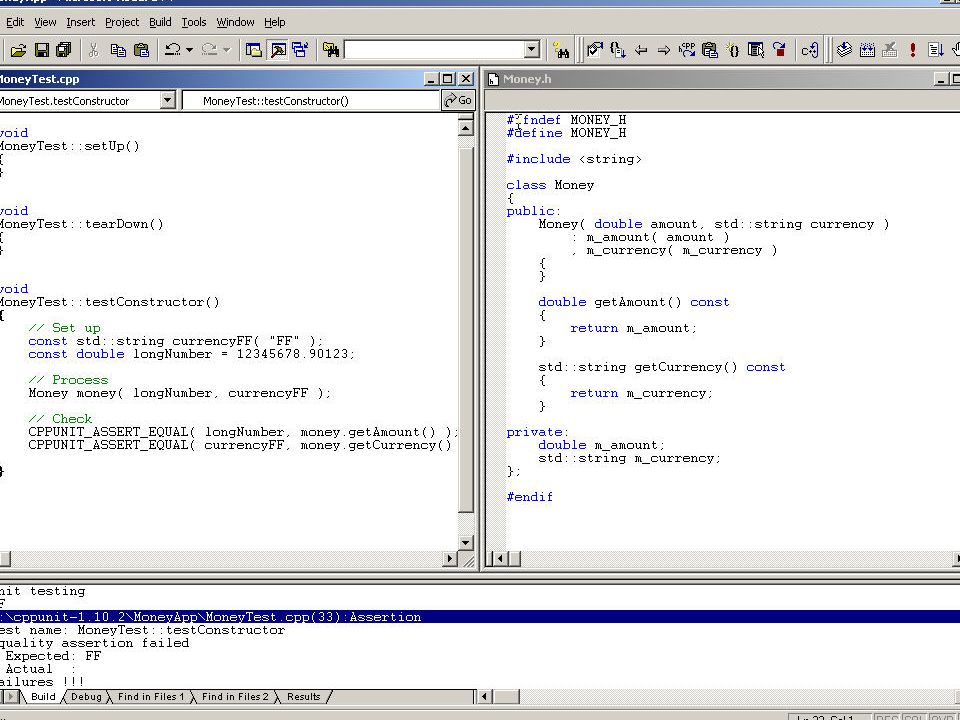
Step 4 Our First Test Terjadi kegagalan test (assertion failed!) Tekan F4, terjadi kesalahan pada data member currency pada class Money Ternyata ada kesalahan pada saat inisialisasi data member currency, perbaiki dan compile ulang Perhatikan snapshot pada slide berikut ini!
 Tekan F4, terjadi kesalahan pada data member currency pada class Money Ternyata ada kesalahan pada saat inisialisasi data member currency, perbaiki dan compile ulang Perhatikan snapshot pada slide berikut ini!")
23
OK (1) menandakan bahwa testing telah berhasil, dengan jumlah testing sebanyak satu kali, yaitu pada perintah CPPUNIT_ASSERT_EQUAL
 menandakan bahwa testing telah berhasil, dengan jumlah testing sebanyak satu kali, yaitu pada perintah CPPUNIT_ASSERT_EQUAL")
24
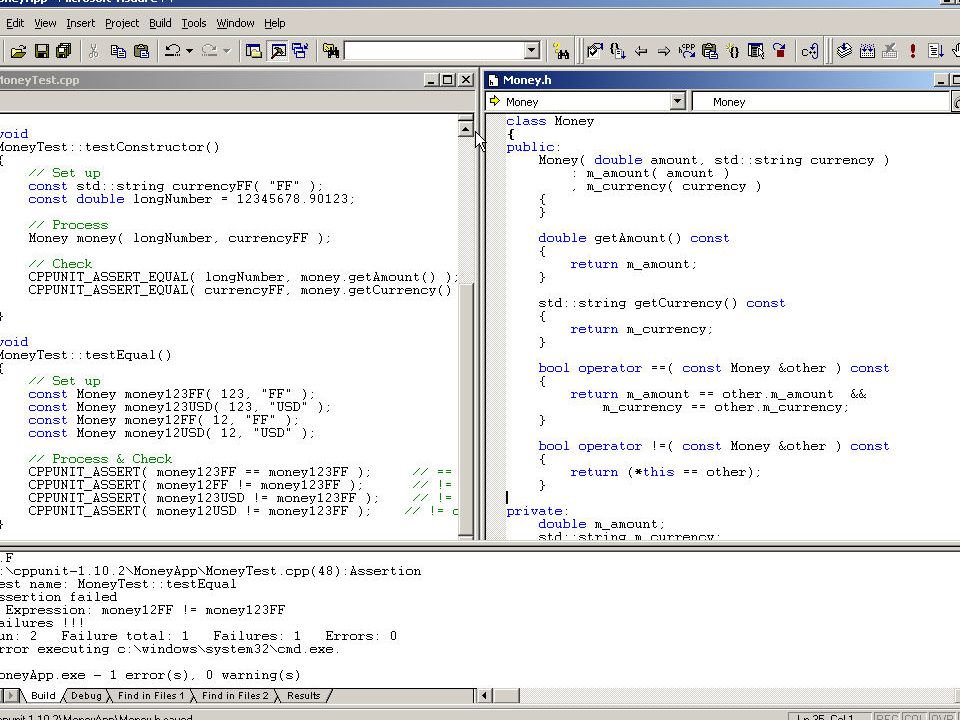
Step 4 Adding More Tests Testing for Equality –Kita akan mentest apakah objek-objek Money yang ada sama atau tidak (Equal or not Equal) –Pada class MoneyTest perlu ditambahkan method CPPUNIT_TEST ( testEqual ), baik definisi dan implementasinya. –Kemudian, implementasikan operator overloading == dan != pada class Money –Dan lihat snapshot berikut ini!

26
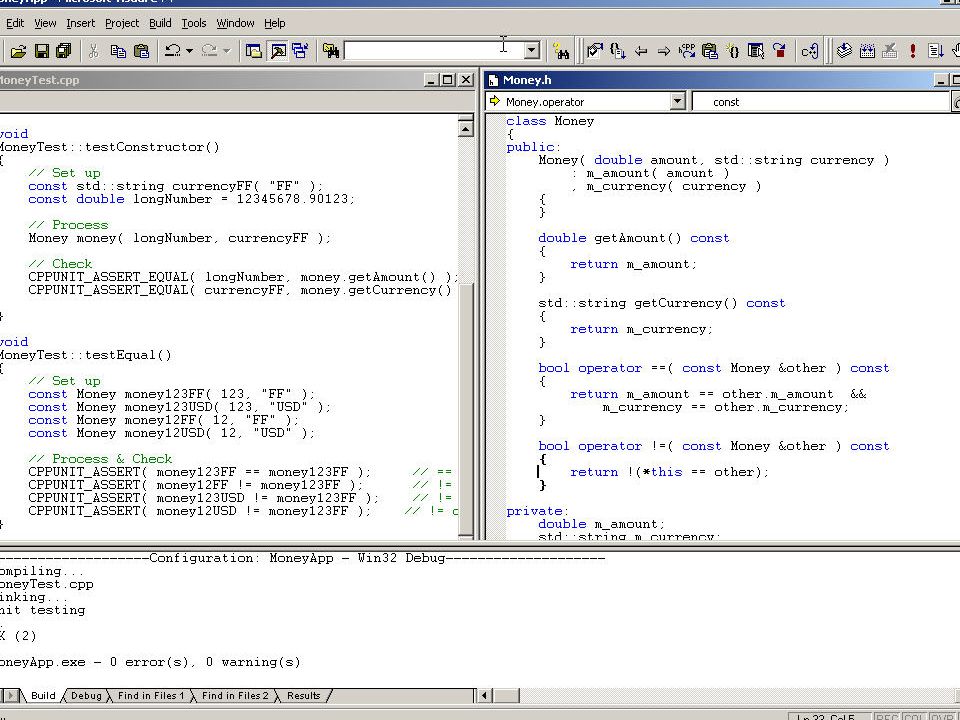
Step 4 Adding More Tests Terjadi kegagalan test (assertion failed!) Kesalahan terjadi pada operator overloading !=. Perbaiki kesalahan tersebut dengan meng-inversi logika yang dihasilkan dengan operator ! (not). Perhatikan snapshot pada slide berikutnya!
. Perhatikan snapshot pada slide berikutnya!.")
28
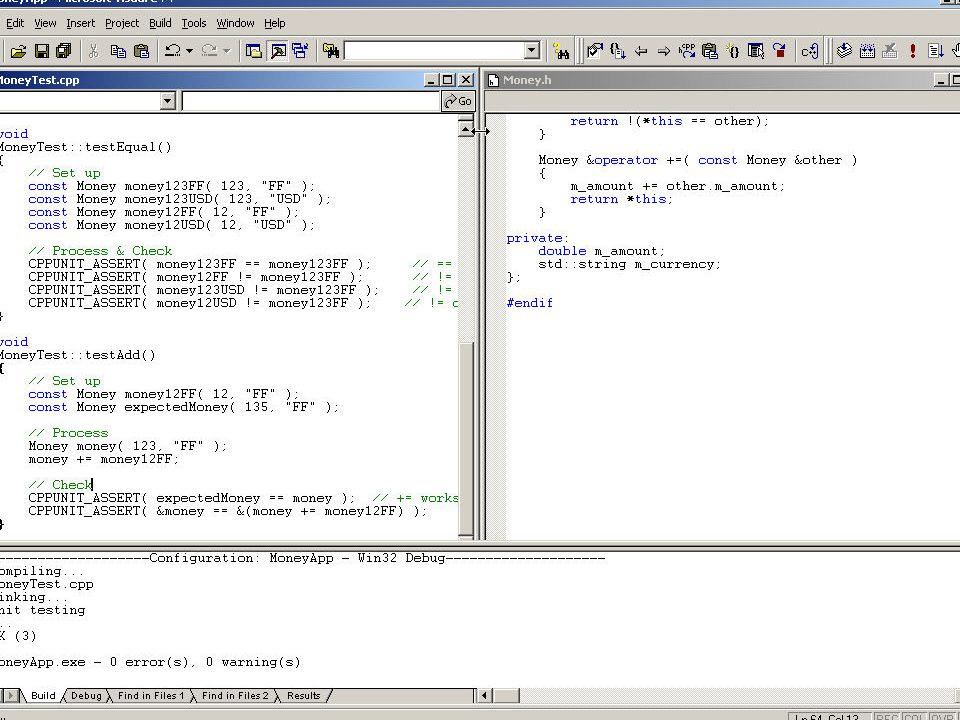
Step 4 Adding More Tests Adding Moneys –Akan ditambahkan method yang dapat menjumlahkan 2 objek Money. –Tambahkan method “testAdd” pada fixture MoneyTest –Kemudian, implementasikan overloading operator += pada class Money –Perhatikan snapshot pada slide berikut!

30
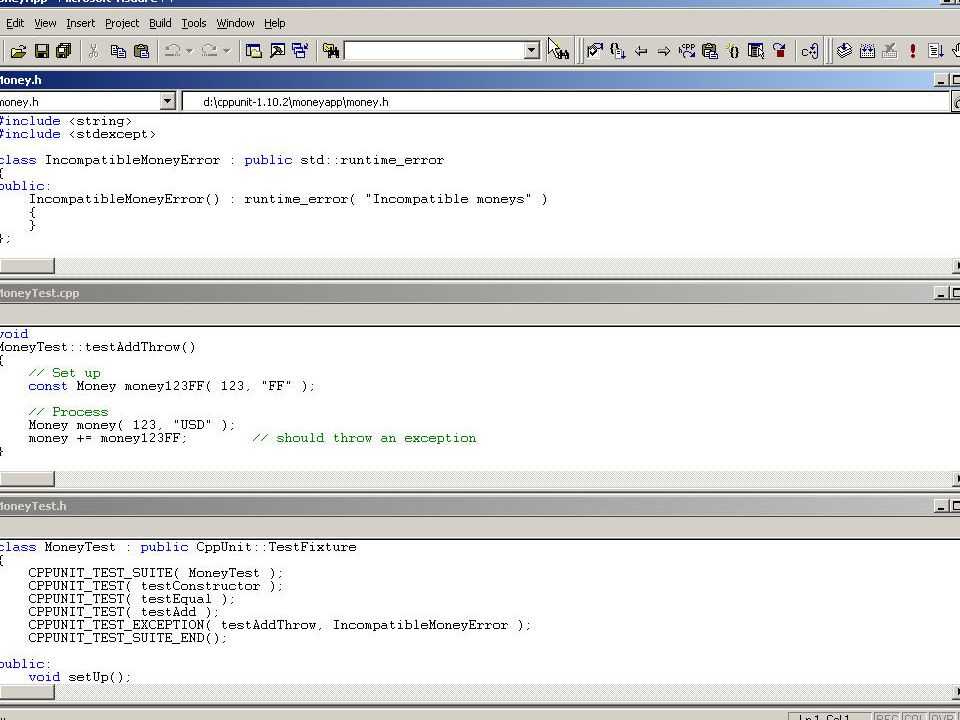
Step 4 Adding More Tests Kegagalan akan terjadi pada testAdd(), jika tipe mata-uang berbeda (currency difference) Maka perlu ada mekanisme Exception,menggunakan kata kunci throw pada VC++. Perhatikan snapshot pada slide berikut!

32
Step 4 Adding More Tests Compile, testAddThrow() failed! Perbaiki method operator overloading += pada, class Money dengan mem-validasi tipe currency menggunakan if () throw IncompatibleMoneyError() Perhatikan snapshot pada slide berikut!
 throw IncompatibleMoneyError() Perhatikan snapshot pada slide berikut!.")
34
Step 4 Selesai

Presentasi serupa


 Input 0 = Mikrokontroler menerima Input berupa tegangan (–) ataupun.>")
