Upload presentasi
Presentasi sedang didownload. Silahkan tunggu

1
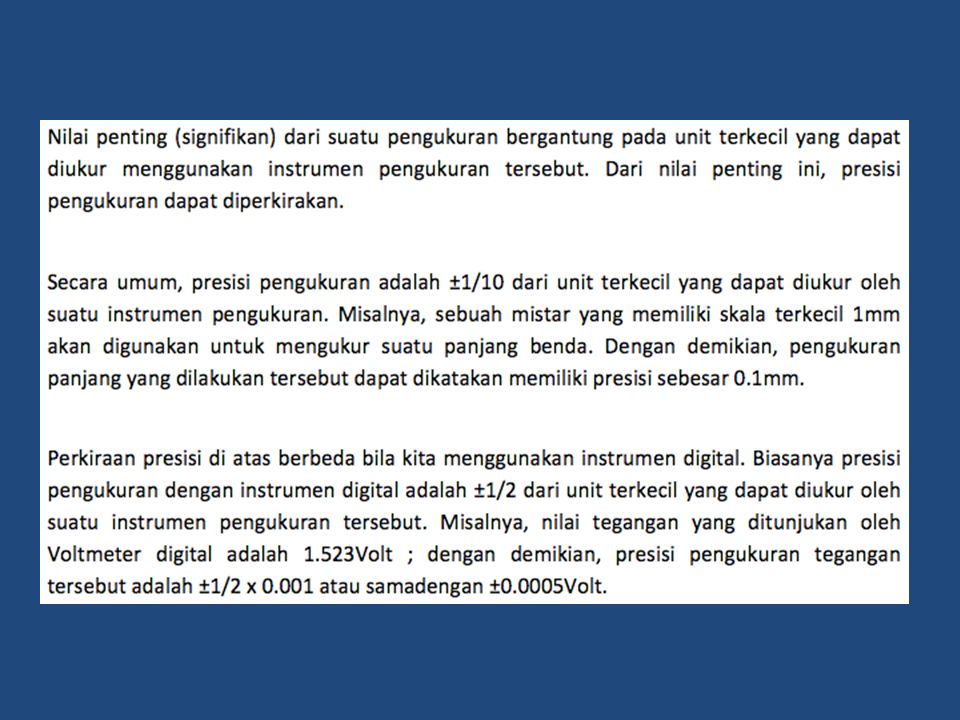
Accuracy is how close a measured value is to the actual (true) value. Precision is how close the measured values are to each other. Keakuratan darisistempengukuranadalahderajatkedekatandaripeng ukurankuantitasuntuknilaisebenarnya (true). Kepresisian darisistempengukuran, jugadisebutreproduktifitasataupengulangan, adalahsejauhmanapengukuranulangdalamkondisitidakberubah, menunjukkanhasil yang sama.
. Kepresisian darisistempengukuran, jugadisebutreproduktifitasataupengulangan, adalahsejauhmanapengukuranulangdalamkondisitidakberubah, menunjukkanhasil yang sama..")
3
Kesalahan Kesalahandarialatukurdinyatakandalam M – T = ε – T : nilaisebenarnyadaribesaran yang diukur – M: harga yang didapatdaripengukuran – ε : kesalahandarialatukur Hasilbagidarikesalahanthphargasebenarnya (ε/T) : kesalahanrelatifataudisebutrasiokesalahan (dalam %) Koreksidilambangkandengan (α), dimana α = T - M α/M disebutkoreksirelatif / ratio koreksidalam (%) Contoharusdenganhargasebenarnya 25,0 A dandiukurdenganhargaukur 24,3 A Berapakesalahan, koreksi, rasiokesalahan, rasiokoreksi : ?
 : kesalahanrelatifataudisebutrasiokesalahan (dalam %) Koreksidilambangkandengan (α), dimana α = T - M α/M disebutkoreksirelatif / ratio koreksidalam (%) Contoharusdenganhargasebenarnya 25,0 A dandiukurdenganhargaukur 24,3 A Berapakesalahan, koreksi, rasiokesalahan, rasiokoreksi :")
4
Pemilihanalatukuruntukkepentinganpengukuran, atauperencanaandalampenggunaanperalatandiklasifikasikandalam 4 golongansesuaidaerahpemakaiannya, yaitu : 1. Alat-alatukurdarikelas 0,05; 0,1; 0,2 alatukurinitermasukgolonganalatukurdenganketelitianataupresisi yang tertinggi. Biasanyaditempatkansecara stationer didalamlaboratorium, dandipergunakanuntukeksperimen-eksperimen yang memerlukanpresisi yang tinggiataupadapengujianalatukur yang lainnya. Alatukurkelas 0,5 ; alatukurinimempunyaiketelitiandanpresisipadatingkatberikutnyadarikelas 0,2, biasanyadipergunakanuntukpengukuran-pengukuranpresisi. Alatukurkelas 1,0; alatukurinimempunyaiketelitiandanpresisipadatingkatlebihrendahdarialatukurkelas 0,5, biasanyadipergunakanpadaalatukur portable yang kecilataualat-alatukur yang ditempatkanpada panel yang besar. Alat-alatukurdarikelas 1,5; 2,5; dan 5; alatukurinidipergunakanpada panel-panel dimanaketelitiansertapresisidarialatukurtersebuttidakbegitupenting.

5
Setiapalatukurlistrikmempunyaikelastersendiri. Kelassuatualatukurlistrikmenunjukkanbesarnyakesalahanpengukuranalatt ersebut. Semakinkecilkelassuatualatukurlistrik, makakesalahanpengukurannyaakansemakinkecil. StandarIEC mengklasifikasikandalam 8 kelas, yaitukelas : 0,05; 0,1; 0,2; 0,5; 1; 1,5; 2,5; dan 5. Hal tersebutdimaksudkanbahwakesalahandarialatukurtersebutmasing- masing ± 0,05 %; ± 0,1 %; ± 0,2 %; ± 0,5 %; ± 1 %; ± 1,5 %; ± 2,5 %; dan ± 5 %. MisalnyaVoltmeter mempunyaikelas 1, hasilpengukurannyamenunjuk 9 Volt, berartihasilpengukurannyaberadaantara: 9 Volt - (1% x 9 Volt) sampai 9 Volt + (1% x 9 volt), atauantara 8,91 Volt sampai 9,09 Volt.
 sampai 9 Volt + (1% x 9 volt), atauantara 8,91 Volt sampai 9,09 Volt..")
6
Contoh Alatukurkelas 1 denganskalamaksimal 3 A, menunjukkanangka 0.6 A dimanahargasebenarnyaadalah 0.62 A Berapabesarkesalahannya : Kesalahanrelatifnya (terhadpaphargapenunjukan) : Kesalahanrelatifterhadaphargaskalamaksimal: Sebab-sebabkesalahan
 : Kesalahanrelatifterhadaphargaskalamaksimal: Sebab-sebabkesalahan")
7
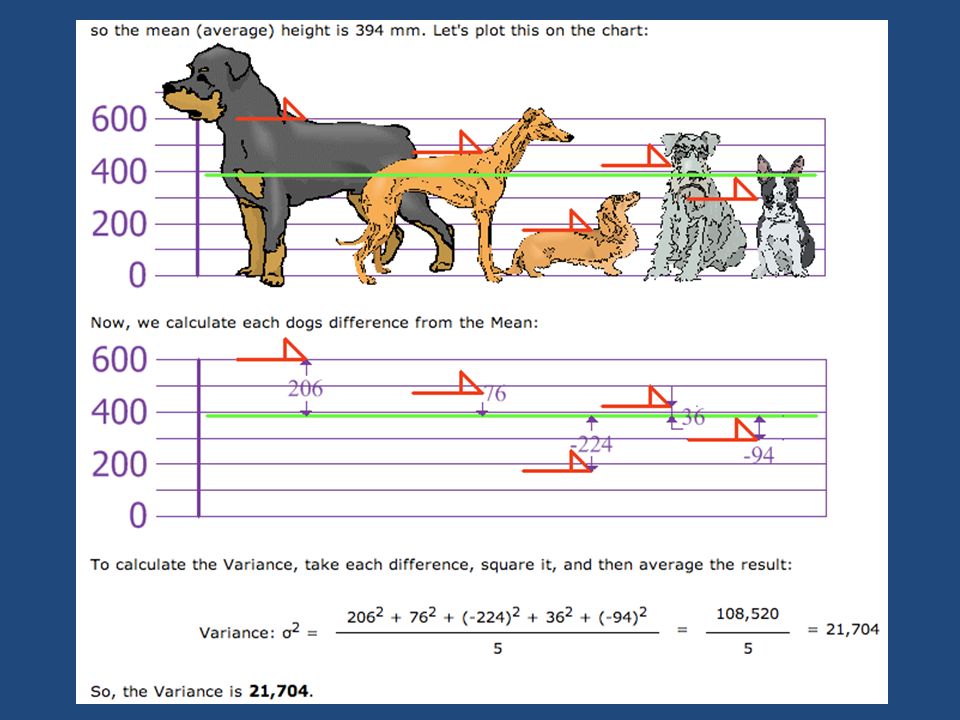
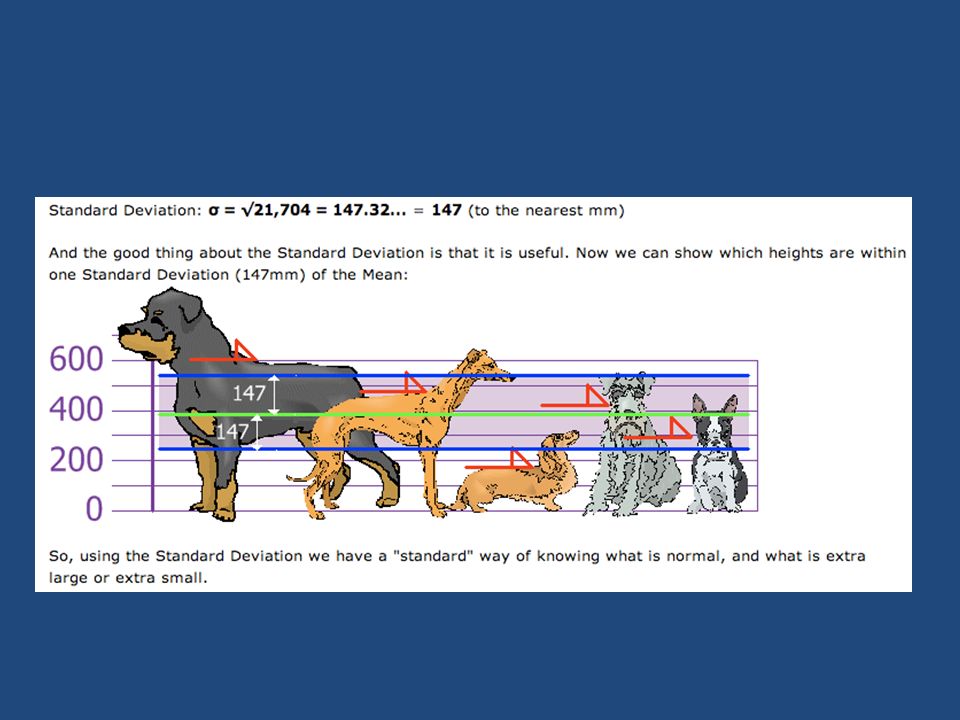
Standard deviasi (σ) Deviation just means how far from the normal it is the square root of the Variance
 Deviation just means how far from the normal it is the square root of the Variance")
10
Ko EAS-PBL/DTE/FTUI Jarum penunjuk Poros Inti besi lunak Kumparan putar magnet

11
KOM

12
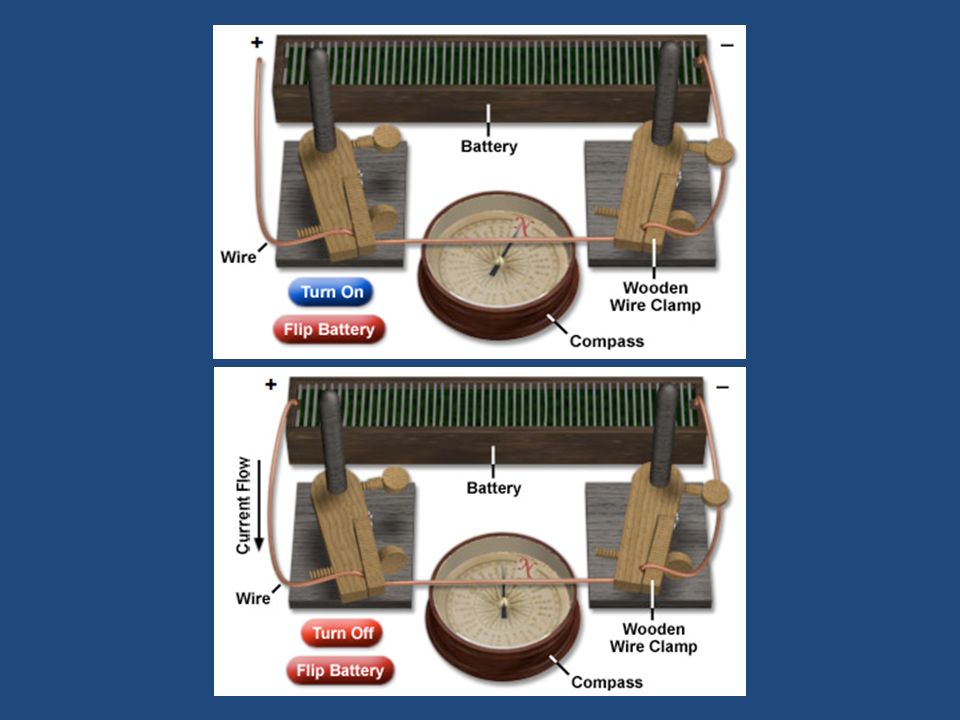
Ørsted's Compass In 1820, a Dane by the name of Hans Christian Ørsted discovered the relationship between electricity and magnetism in a very simple experiment that is shown in the below tutorial. One evening, as Ørsted was setting up materials for a lecture, he brought a compass close to a live electrical wire, and observed that the needle on the compass jumped and pointed to the wire. More experimentation showed that a circular magnetic field surrounded a current- carrying wire. Ørsted had proved that electricity and magnetism were connected and the study of electromagnetism was born.1820Hans Christian Ørstedcurrent- carrying wire The equipment in the tutorial models Ørsted's 1820 apparatus. The battery is a voltaic pile constructed of copper and zinc plates in a dilute acid solution. A copper wire is held in place by wooden clamps. Because the battery is not connected, the compass needle points north, attracted solely by the Earth's magnetic field.voltaic pile Click the Turn On button to connect the battery and create an electric current in the wire, which travels from the positive to the negative terminals. When the current flows through the wire, the compass needle aligns itself with the magnetic field created by the electrons traveling in the current, rather than with the Earth’s magnetic field. Because the magnetic field travels around the wire in a circle (see our Magnetic Field of a Wire tutorial), the compass will point in different directions depending on where it’s placed. If you hit the Flip Battery button to reverse the direction of the current in this tutorial, the magnetic field around the wire will reverse direction, too, as will the compass needle.Magnetic Field of a Wire
, the compass will point in different directions depending on where it’s placed. If you hit the Flip Battery button to reverse the direction of the current in this tutorial, the magnetic field around the wire will reverse direction, too, as will the compass needle.Magnetic Field of a Wire.")
13
Whenever current travels through a conductor, a magnetic field is generated, a fact famously stumbled upon by Hans Christian Ørsted around 1820. Depending on the shape of the conductor, the contour of the magnetic field will vary. If the conductor is a wire. The magnetic field is strongest in the area closest to the wire, and its direction depends upon the direction of the current that produces the field, as illustrated in this applet. Presented in the tutorial is a straight wire with a current flowing through it. Plus and minus signs indicate the poles of the battery (not shown) to which the wire is connected. The conventional direction of current flow is indicated with a large, black arrow. (As convention dictates, the current flow opposes the actual direction of the electrons, illustrated in yellow). The magnetic field lines generated around the wire due to the presence of the current are depicted in blue. To observe the direction of the field at any given point around the circumference of the wire, click and drag the compass needle, (its north pole red, its south pole blue). The direction of the magnetic field around the wire is also indicated by the small arrows featured on the individual field lines. Click the Reverse button to change the direction of the current flow and observe the effect this change exerts on the wire’s magnetic field. There is a simple method of determining the direction of the magnetic field generated around a current-carrying wire commonly called the right hand rule. According to this rule, if the thumb of the right hand is pointed in the direction of the conventional current, the direction that the rest of the fingers need to curl in order to make a fist (or to wrap around the wire in question) is the direction of the magnetic field.
 to which the wire is connected. The conventional direction of current flow is indicated with a large, black arrow. (As convention dictates, the current flow opposes the actual direction of the electrons, illustrated in yellow). The magnetic field lines generated around the wire due to the presence of the current are depicted in blue. To observe the direction of the field at any given point around the circumference of the wire, click and drag the compass needle, (its north pole red, its south pole blue). The direction of the magnetic field around the wire is also indicated by the small arrows featured on the individual field lines. Click the Reverse button to change the direction of the current flow and observe the effect this change exerts on the wire’s magnetic field. There is a simple method of determining the direction of the magnetic field generated around a current-carrying wire commonly called the right hand rule. According to this rule, if the thumb of the right hand is pointed in the direction of the conventional current, the direction that the rest of the fingers need to curl in order to make a fist (or to wrap around the wire in question) is the direction of the magnetic field..")
14
The equipment in the tutorial models Ørsted's 1820 apparatus Ørsted had proved that electricity and magnetism were connected and the study of electromagnetism was born. http://www.magnet.fsu.edu/educ ation/tutorials/java/oersted/index. html 14 August 1777 – 9 March 1851

16
A charged particle moving through a magnetic field experiences a force that is at right angles to both the direction in which the particle is moving and the direction of the applied field. This force, known as the Lorentz force, develops due to the interaction of the applied magnetic field and the magnetic field generated by the particle in motion. The phenomenon is named for Dutch physicist Hendrik Lorentz, who developed an equation that mathematically relates the force to the velocity and charge of the particle and the strength of the applied magnetic field.

17
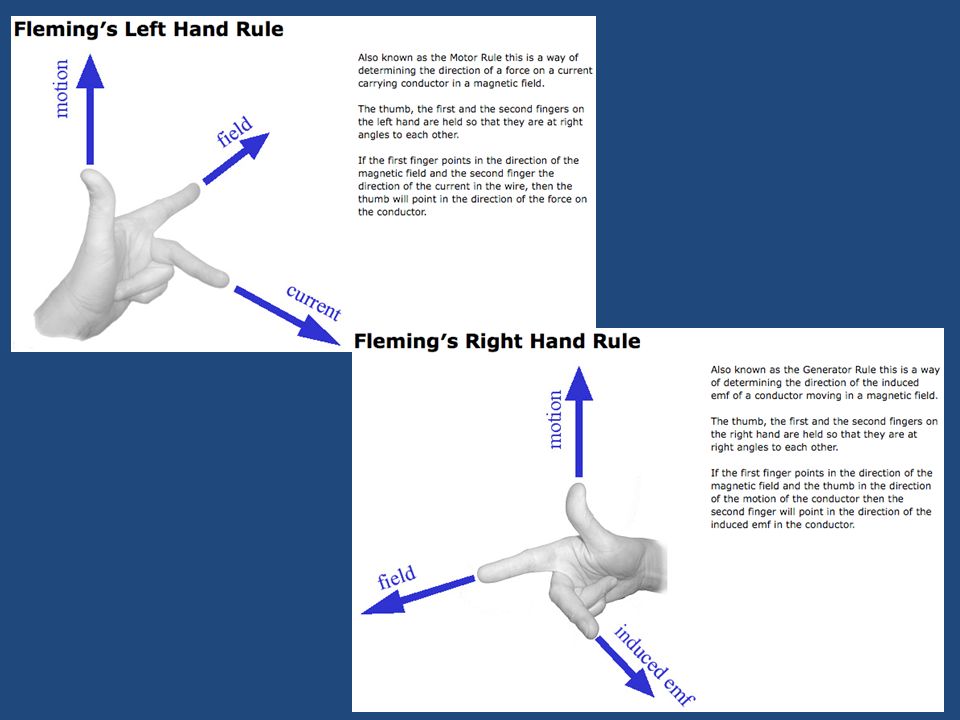
You can predict which way the wire will move by using the left-hand rule. You need to contort your hand in a bit of an unnatural position for this rule: If your index finger points in the direction of a magnetic field, and your middle finger, at a 90 degree angle to your index, points in the direction of electrical current, then your extended thumb (forming an L with your index) points in the direction of the Lorentz force exerted upon that particle, and the direction in which the wire shifts in the tutorial.
 points in the direction of the Lorentz force exerted upon that particle, and the direction in which the wire shifts in the tutorial..")
Presentasi serupa


>")


 (Part 2)>")


)>")